VisualCommunication
GMD101
AGENDA
◊
AGENDA:
(Dates and projects are subject to change)
WEEK 01 _Feb 04_______________________________________________
◊ MON
Intro.
Syllabus
Book
Communication
Office hours
Tools
File naming
...
◊ WED
Selfie?
-- Around Photoshop
-- Around Illustrator
-- Documents/Imports and Outputs
Let's make some lines. (or paths?)
All shapes has 2 parts!
Demo:
In-Class practice Download files > Here
Home practice Download files > Here
Read: Creating public ePortfolio on Canvas
Project 1: Fortune Cookie ( Make it personal)
Upload 2 files to Canvas before next class.
1. Shape assignment: from agenda page
2. Houes:
Take a good/straight/frontal photo of your building (home, house, dorm, ...).
Draw your house in Illustrator.
Keep your lines straight. No curves.
Use only flat/solid colors. No gradients or textures.
In Illustrator save your .ai file for archive. Export the file as .jpg .
In Photoshop place your drawing AND your real photo in a letter size document/portrait/print quality/1" margin.
WEEK 02 _Feb 11_______________________________________________
◊ MON
Your library membership? Book? Tools?
Now activate your Lynda membership.
Your book is here?!
Class notes [pdf]
Project 1: Fortune Cookie [Brief]
Think about idea and bring to the class on Wednesday.
Upload your thought(!) as text/words to Canvas before class time.
Pathfinder [Download]
◊ WED
Read: Guide to Graphic Design Ch.1 and Ch.2 before next class.
LYNDA > Photoshop CC 2018 One-on-One: Fundamentals > Chapter 3 and 4
Using Photoshop prepare your images and upload 4 images in required format to Canvas:
1. A celebrity portrait 5" by 5" print quality, jpg format
2. A natural landscape 4" by 8", medium quality, png format
3. A high-rise building in black and white 1200px by 400px, Internet quality, tiff format
4. An instrument in square proportion in size 2MB, jpg format
Due: By the end of class.
WEEK 03 _Feb 18_______________________________________________
◊ MON
Project 1 visual expansion
Your junk box, Collecting assets
Concept > Visual.
Share your Pinterest board [Here]
Share your Pinterest board [Here]
◊ WED
Graphic Design concepts
Reading an artwork/image
Writing an artwork/image
Expanding your visual search
Reviewing your ideas.
Ask > Search > Think > Make
WEEK 04 _Feb 25_______________________________________________
◊ MON
3 sketches on Project 1
Reviewing sketches/thumbnails
Ask > Search > Think > Make
Collage / Montage in Photoshop
Demo on Photomontage (DADA - SURREALISM)
Download the guide [here]
Download the assets and template [here]
◊ WED
Surreal Practice
Upload the result to your canvas.
Scanning / Adjusting and color correction
Masking in Photoshop/ Blending images
Review files for print
WEEK 05 _Mar 04_______________________________________________
◊ MON
Due Today: Project 1 Due - 3 deliverables - Wall Critique
Save your final files according to the brief.
Upload your files to the Canvas; 3 PDF, 3 JPG.
◊ WED
Form and Meaning
Pixel to Vector
Tracing Images
Introducing Project 2 [Here]
Digital Self Portrait [Here]
1- Make a self portrait - 2500px x 2500px (Square) maximum 5 colors
2- Create a vertical document 5000px x 2500px
Watch Image Tracing technique on Lynda (For Example: Illustrator: Tracing Artwork)
USEFUL TOOL: Adobe Color [Here]
WEEK 06 _Mar 11_______________________________________________
◊ MON
Upload your digital portrait file to Canvas before class.
Project 2: Your Object
Bring your object to class.
Phase 1 Twelve (12) 3x3” photos of your object due 03.13
The photos will be well lighted with no harsh shadow, cropped, cleaned and resized to requirement.
Photos will be uploaded to your folder on Google Driver before next class. Create a folder and sub-folder following below format:
02_Project 2 > PartA_Photos
Make sure your object photos include: The whole object, familiar and unfamiliar angles, detail, meaningful background, in use or function (if applicable),...
Online links to take a better shot:
On Lynda > Mobile Photography Weekly with Seán Duggan > Simple product photography with your phone
On YouTube > How To Build A Photo Light Box [Here]
On YouTube > DIY Product Photos - Easy, Cheap and Good-looking [Here]
On YouTube > Build A Light Box On The Cheap [Here]
◊ WED
Due before class:
12 photos of the object in your GDrive. (retouched, cropped, cleaned, sized) including silhouette, different angles, with and without background showing whole and details of the object.
Phase 1,2 Twelve (12) 3x3” pencil/pen/marker sketches of your object due 03.18 before class
Document all your sketches in your sketch book. You need to scan best 12 for the project.
Upload your sketches into GDrive following:
02_Project 2 > PartB_Sketches
WEEK 07 _Mar 18_______________________________________________
◊ MON
Phase 1,2
Due before class
12 sketches in pencil/pen/marker
◊ WED
Phase 1,2
Due before class:
12 interpretations of the object in any creative medium by your choice
02_Project 2 > PartC_Mediums
TYPE AND TYPOGRAPHY
Phase 3
Follow the instruction to create your brief/statement
Save your statement/brief in Microsoft Word/Pages and upload your brief file in GDrive:
02_Project 2 > Brief.docx
Choose 2 options for your typeface.
WEEK 08 _Mar 25_______________________________________________
◊ MON
Phase 3
Review the brief and the choice of the typeface and finalizing the logo/logotype.
Adobe InDesign - Your management tool for type and image.
The basic in InDesign!
Image
Type tool, Typefaces, Fonts, Kerning, Tracking, Leading, Type on path/curve, ...
Export PDF
Download the InDesign Template [Here] [Old Version]
Import all your 36 images +
Brief +
Type choice +
Final version of logo in 2 size (color) +
Final version of logo in 2 size (BW)
= Total 12 pages
Make sure you have all your assets for project 2 in a correct folder:
02_project 2
>
PartA_Photos > 12 separated photos (resized in 3" x 3", 300dpi)
PartB_Sketches > 12 separated sketches (resized in 3" x 3", 300dpi)
PartC_Mediums > 12 separated mediums ( resized in 3" x 3", 300dpi)
Brief.doc
Type options (Upload by the end of class Mar 25th.)
Logotype sketch in InDesign (Upload by the end of class Mar 25th.)
◊ WED
Students created a Draft folder (March27_Draft) to upload the most recent files including:
Brief, Choice of types, latest version of design+logotype
After spring break: Wall crit.
FInal works without any progress report will not have complete grade.
Phase 4
POSTPONED > Due Today: Project 2 Due - Wall Critique - 2 deliverables : a) Digital file (pdf) to Titanium. b) 4 pages in print for wall critique, letter size.
WEEK 09 _Apr 01_______________________________________________
SPRING BREAK
WEEK 10 _Apr 08 _______________________________________________
◊ MON
Project 2 - Wall critique
Due Today: Project 2 Due - Wall Critique - 2 deliverables : a) Digital file (pdf) to Titanium. b) 4 pages in print for wall critique, letter size.
◊ WED
Quiz: Chapter 7 - Typography
Activating online portfolio via Canvas
ePortfolio
Portfolio Name: NAME LASTNAME GMD101 SP19
Sections:
Intro (Your profile picture, your favorite quote or phrase, short bio, contact info, social media,...)
P1 Fortune Cookie (Project title, your pinterest link, short description of your thinking process, 3 final results)
P2 Object (Project title, short description of your thinking process, your challenge, final PDF)
Keep the ePortfolio private.
Share your ePortfolio link [Here] AND via Canvas.
DUE: 11:59 pm Sunday, April 14th.
WEEK 11 _Apr 15_______________________________________________
◊ MON
Chapter 2 - Quiz
Read CHAPTER 2 - A BRIEF HISTORY OF GRAPHIC DESIGN
Modular typeface
Design your geometric typeface:
Follow the instruction [Here]
Begin with a good size grid. Bigger grids will give you more opportunity and more possibility.
Think about square OR rectangle grid; 4x4, 5x5, 6x6, ...10x10, ... OR 4x6, 5x7, 6x8, ...8x12, ...
Set your goal on lowercase OR uppercase.
Start with H, O, M, A or n,o,b,a,v
Use illustrator to execute your design.
Keep the Grids on. ( View menu > Show Grids)
Keep Snap to Grid on. (View menu > Snap to Grid)
Use ruler/guides when you need them. (both in View menu)
You can rotate, flip, replicate each piece, but changing scale is not allowed.
Showcase your typeface in by typing TYPE DESIGN at the bottom of your design.
You can use this template to start with. [Here]
Upload your design to the Canvas before next class on Thursday.
◊ WED
Due today before 10:35am: Modular Typeface
Check your grade with me
Introducing Project 3, Movie Poster [Here]
Movies list [Here]
WEEK 12 _Apr 22_______________________________________________
◊ MON
Bring to the class:
Share your research on your movie via canvas.
7 Tips to design a good movie poster.
Movie Poster and cliches.
Movie poster and typefaces.
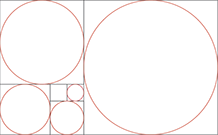
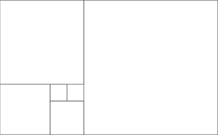
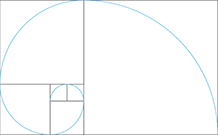
Golden Section [Here]
Adobe Color [Here]
Rule of thirds template for movie poster sketch [Here]
◊ WED
Due today:
Gather image/design close to YOUR idea in a board on Pinterest.
3 sketches (3 different ideas!) using a golden section.
Research on golden ratio and use your favorite one.
We select one of your idea and develop the design to the final step during the weekend.
Download the credit template [Here]
Read Chapter 8 - Grids and Alignments (Only 17 pages)
WEEK 13 _Apr 29_______________________________________________
◊ MON
Due Today:
Draft print in BW
We make a draft print (1:1 scale) in Black and White in class by breaking down the poster in 6 tiles.
Use photoshop template to divide the poster [Here]
◊ WED
Social media design requirements.
Your movie ad for: Instagram, Twitter, and Facebook.
Cheat sheet Social Media Image Sizes [Here]
Practical online reference [Here]
How is the poster?! Quality? Originality? Composition? Visible title? ...
WEEK 14 _May 06_______________________________________________
◊ MON
Group Critique | Project 3 Movie Poster
Download the template for social media content and import your design accordingly. [Here]
Typeface: ITC Franklin Gothic LT ( or similar condensed sans-serif)
◊ WED
Due: Movie social content - PDF file
Quiz Chapter 8
Submit to the canvas and ePortfolio:
Canvas: 1.Poster in PDF 2. Social Media in PDF
ePortfolio: 1. Poster in JPG 2. Social media in 6 JPG slides
Art of Title [Here]
To consider:
Panic Room, Catch Me If You Can, Walk on the Wild Side, True Detective, Se7en, Dexter, Mad Men, Juno, Requiem for a dream
Introducing After Effects
Working file for After Efter Effects [Here]
Upload your vote! file to the Canvas by the end of class.
Introducing Project 4, Title Sequence [Here]
WEEK 15 _May 13_______________________________________________
◊ MON
Due today:
Presentation on your TV show
Ken Burns and Ken Burns Effect [Wiki]
Ken Burns working files [Here]
Watch on Lynda: After Effects CC 2019 Essential Training: The Basics by Mark Christiansen
For sure watch Introduction and Foundations chapter. (My recommendation is all 2 hours.)
Download Storyboard template [Here]
Print as much as you might need for sketches.
For example:
For One minutes (60 Seconds) Title sequence you may have 20 cut. (every cut last for 3 seconds on scree)
Some of the cut may have 1 shot, or 2 or 3 or more.
Every story board frame represent one of these shot.
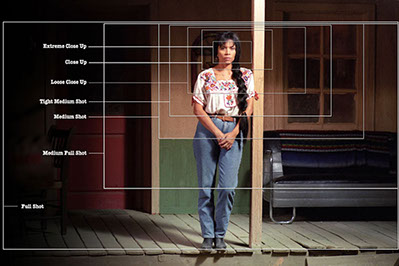
Type of Shots | tutorial links [Here]
Story Board example [Here]
Upload your presentation to Canvas.
(Don't forget to upload your Social Media to the Canvas before closing time)
◊ WED
Due today:
Your title sequence Story Board
Upload your Story board sketches to Canvas.
Share your pinterest board (for ideas, assets, inspirations,...) [Here]
Collecting assets, visual inspiration on Pinterest
Your Idea for short clip or GIF using Green Screen
After Effect: Keying
Keying working files[Here]
WEEK 16 _May 20_______________________________________________
◊ MON
Due today by the end of class.
Your title sequence digital draft, 60 second time-line in After Effect as your main structure including soundtrack.
Adjusting sound
Masking
Color adjustment
◊ WED
Due today - by the end of class.
Your title sequence in final version. export as .mov
WEEK 17 _May 27_______________________________________________
◊ MON
MEMORIAL DAY
◊ WED
Last Day
ePortfolio
Online Portfolio
Personal Branding
Project 5: Online Portfolio
CREATE an online portfolio that showcases your art and design work.
1. Portfolio should include a personal signature (a site reflecting your individual style with a personal logo or ID)
2. A brief written introduction (100 - 200 words)
3. Examples of all course work
4. At least one example of your creative process (visual project diary), comprised of project objectives, thumbnails sketches and final design
5. Contact Information/link
6. Portfolio can also contain other relevant art & design examples from other classes and/or personal projects
Your portfolio must be well organized, clearly labeled and express your story.
Looking for ideas? Use google and search ''personal signature + graphic design"
0-50 points based on:
- Quality of personal signature
- Quality of introduction
- Depth and quality of portfolio
- Depth and quality of creative process
- Contact information
- Bio
LAST SUBMISSIONS
Online Portfolio URL [Here]
ePortfolio link [Here]
NO LATER THAN Friday 31th. 8 pm

Tips on selecting your assets------------------------
Common surrealist elements/themes:
Slow flying things (insects, birds, balloons, etc.)
Food
Hybrids (ordinary animals or objects spliced together)
Sensory organs (mouths, eyes, ears, fingers, noses, etc.)
Insect parts (wings, heads, legs, etc.)
Human parts (any)
Some whole animals (dogs, crabs, fish, turtles, etc.)
Astrological symbols
Cloudscapes
Vast landscapes
Golden color
Elements that have symbolic/referential meaning
Things that represent birth and death (skulls, skeletons, babies, etc.)
Things that show time (watches, clocks, calendars, sundials, etc.)
Changes in scale (giant ants, tiny elephants, etc.)
Replacements (birds in a fish tank, dogs driving cars, etc.)
Portals (doors, windows, gates, etc.)
Game pieces (chess, cards, etc.)
Consider using:
Floating objects
Bending the laws of physics
Mystical spaces
Transformed/hybrid creatures/objects
Changes of scale
Making interior into exterior